Recently, at my local Milwaukee Alteryx User Group, I presented a segment titled “Alteryx Speed Tips” in which I shared a handful of helpful tips when using Alteryx Designer. Sharing these tips — some of which came from people in my Alteryx community — led to people in the audience sharing their own tips, which resulted in even more knowledge for us all.
I decided to put them all together in a blog post, but as I started to write the post became lengthy. As a result, I will be making these tips part of a series. Part 1 is dedicated to setting up your development environment and understanding the resources and settings available to you.
Some of these tips are things you probably already know, but I hope there are a few new ones you pick up. Here we go…
Customize User Settings
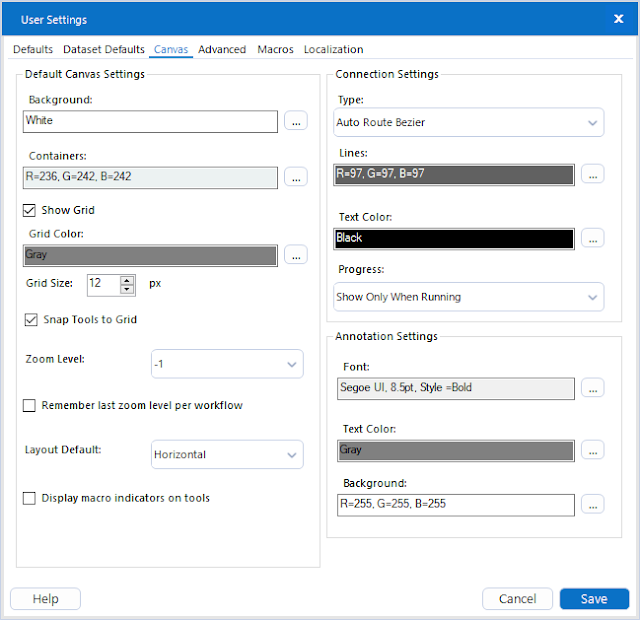
This might be obvious, but there are a few ways to customize your Alteryx Designer development environment to make working with the tool easier for you. First, under Options > User Settings > Edit User Settings you can set the default zoom settings if you need the canvas zoomed in farther in or out. You can also turn on the grid, which makes aligning tools easier. And you can set some default fonts and colors here, if you want to be extra. There are many other settings for you to explore as well.
Toggle On/Off Panels
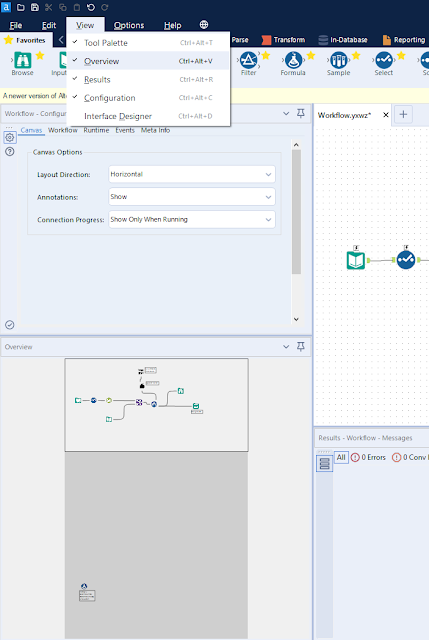
Under the View menu you have the ability to toggle on or off different panels. Some will likely always be on (I'm looking at you, Configuration panel), while others may be needed only some of the time. The Overview panel provides a very zoomed out view of the workflow. This is particularly helpful if you are working with a large workflow that can’t be seen in full. The lighter colored box indicates what is currently visible on the canvas. You can click anywhere within the Overview to immediately jump to that section of the workflow.
Leverage Interface Designer
In addition to the Overview pane, the Interface Designer pane gives you a view of what interface tools will look like to your end user. You can group, rearrange, and provide instructions for the various interface tools in the workflow. From here, you can select the magic wand icon on the left side and interact with the interface tools as an end user would. If you want to run the workflow with a specific set of variables, you can set them here, click Open Debug, and a workflow will open in a new tab with your selections in place. Shout out to Colleen Hayes who taught me this at a Milwaukee Alteryx User Group event. There is much more to cover on interface tools and the designer itself, but I highly recommend playing around with the design/layout options for an improved user experience.
Grouped by Color and Shape
Another obvious one, but tool groupings (the different tabs across the top of Alteryx Designer) are indicated both by the color of the tool and their shape. Input and Output tools are represented by a folder icon in a beautiful teal color. Preparation tools are blue circles. Parse tools are light green hexagons. It is easy to see where these tools are used in the workflow as a result. Having both shape and color used as an indicator is helpful for people who are color blind.
Use the Help Button
When working with a tool, one of my favorite resources is the help button located on the left side of the configuration panel. With a given tool selected, clicking the question mark icon will take you to the associated Alteryx documentation page. A description of the tool, along with details about the various settings and examples are provided in one easy place.
Disable All Tools that Write Output
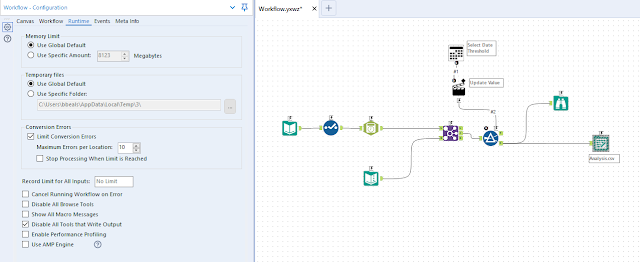
Finally, the Workflow Configuration panel contains a few key tips. To access the Workflow Configuration panel, click anywhere on the canvas that isn’t a tool and it will appear on the left (assuming you have the Configuration panel turned on). On the Runtime tab you can check a box to disable output tools. This is particularly helpful if you are troubleshooting a workflow and don’t want data to actually be written to a file or database immediately. I will check this box, run my workflow, validate the results, fix the workflow as needed, then deselect the box before running the workflow a final time. During the meeting, I complained about the 3 clicks it takes to get to this checkbox since I use this feature so frequently. Well, Matt Michaelson created an idea on the Alteryx Community to give this option a shortcut. Please vote!
Document your Workflow
Also in the Workflow Configuration panel is the Meta Info tab, which allows you to write a description, add a URL, and set author information. For the description section, I like to use a template to make descriptions easier to read, to ensure I am capturing all the pertinent information, and to make my life easier. Descriptions show up on Alteryx Gallery, too, so end users will see the information you write here. Check out my post about description templates in Tableau, which looks to achieve a similar goal. The URL is just want it sounds like. I use this for additional documentation or to link to a related Tableau data source that needs to be refreshed after the workflow is run. The author information is nice if you want others to know who built the workflow. An initial, one-time set up is required. Fill in the text boxes and select the Remember as Default link. Going forward just click Set to Default and the text you previously entered will be filled in for you. Filling out this tab isn't the most fun part of developing an Alteryx workflow, but it will pay dividends if anyone looks at this workflow.
Send Emails
There is also an Events tab in the Workflow Configuration panel. Here you can set up emails to be sent when a workflow runs. This is helpful to share log information, or to report that data was processed. It's fairly easy to set up if your organization already has an SMTP server.
Stay tuned for Part 2!


